Seamless Token Swaps for Developers(2): Building a Minimalistic UI for MiniKLAYswap Contract using Thirdweb and Next.js
Overview
In Part 1, we learned about KLAYswap and how to implement KLAYswap V2 in your smart contract programmatically using the UniversalRouter. In this guide, you will learn how to build a minimalistic frontend that interacts with the MiniKLAYswap contract created in part one using thirdweb and Next.js.
To get started quickly, you’ll find the entire code for this tutorial on GitHub. This way, you can explore the inner workings of the application as you follow along.
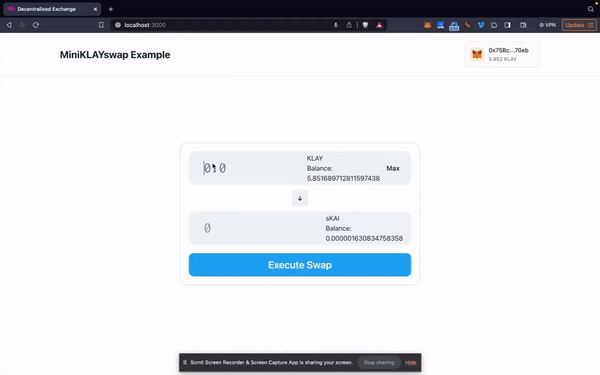
The final output will look like this:
Prerequisites
Before getting started, you need the following prerequisites:
- Node.js and its package manager, NPM, version 18. Verify Node.js is installed by running the following terminal command: node -v and npm -v
- A basic understanding of JavaScript, Solidity, and React/Next.js.
- ClientID from ThirdWeb’s dashboard
Project Setup and Installation
To start the project setup and installation quickly, clone this project on GitHub using the following command:
git clone https://github.com/ayo-klaytn/mini-klayswap-example.gitNext, change the directory into the cloned folder and install the project locally using npm with the following command:
cd mini-klayswap-example && npm i && npm run devBuilding a Next.js frontend application with smart contract
In part one, you successfully built and deployed the MiniKLAYswap smart contract. Now, it’s time to interact with it from a frontend, just as you would typically engage with dApps on the web.
Having already cloned the Next.js frontend project, you can now move forward with updating the existing application and connecting your smart contract to a frontend for testing and interactions.
Initial Setup
In this section, you want to make sure you have all the necessary components and parts all set up.
- Replace NEXT_PUBLIC_TEMPLATE_CLIENT_ID in your .env file with your own CLIENT ID generated on the thirdweb’s dashboard.
- Navigate to the const/details.ts file in your project folder and make sure you have the following.
a. ACTIVE_CHAIN = KlaytnCypress
b. sKAI_TOKEN_ADDRESS = 0x37d46C6813B121d6A27eD263AeF782081ae95434
c. KLAYSWAP_TEST_ADDRESS = 0xF9FB3C6f132CE967DE7790DD5aE670B8ddBfa246 // Paste your MiniKLAYswap contract address here
| *Note: You can change the sKAI_TOKEN_ADDRESS to any token address as long as the liquidity pool of KLAY/ Token exists. |
Building the dApp
In this section, we will focus on going over the frontend code in the pages folder.
A. _app.tsx
import { ACTIVE_CHAIN } from "../const/details";
import "../styles/globals.css";
import { ChakraProvider } from "@chakra-ui/react";
import { ThirdwebProvider } from "@thirdweb-dev/react";
import type { AppProps } from "next/app";
export default function App({ Component, pageProps }: AppProps) {
  return (
    <ThirdwebProvider
      clientId={process.env.NEXT_PUBLIC_TEMPLATE_CLIENT_ID}
      activeChain={ACTIVE_CHAIN}
      supportedChains={[ACTIVE_CHAIN]}
    >
      <ChakraProvider>
        <Component {...pageProps} />
      </ChakraProvider>
    </ThirdwebProvider>
  );
}
In the code above,
- The ACTIVE_CHAIN represents the supported chain (KlaytnCypress) as stated in the const/details file
- Next, we imported the global.css file from the styles folder
- Also, we had ChakraProvider and ThirdwebProvider all set up at the root of our application.
- To use an API key with the Thirdweb React SDK, we passed the clientId to the ThirdwebProvider and also set the activeChain and SupportedChains
B. Index.tsx
This file houses the core functionality and components of building our MiniKLAYswap frontend. Be sure to import all essential functions from thirdweb React SDK, chakra-ui/react, including the components as seen below:
//...
import Head from "next/head";
import { Inter } from "next/font/google";
import Navbar from "../components/NavBar";
import SwapInput from "../components/SwapInput";
import {
  Button,
  Flex,
  Spinner,
  useToast,
} from "@chakra-ui/react";
import { ACTIVE_CHAIN, KLAYSWAP_TEST_ADDRESS, sKAI_TOKEN_ADDRESS } from "../const/details";
import {
  ConnectWallet,
  toWei,
  useAddress,
  useBalance,
  useContract,
  useContractMetadata,
  useContractRead,
  useContractWrite,
  useNetworkMismatch,
  useSDK,
  useSwitchChain,
  useTokenBalance,
} from "@thirdweb-dev/react";
import { useState } from "react";
const inter = Inter({ subsets: ["latin"] });
export default function Home() {
//...
}
Next, create the following state variables and functions to interact with the smart contract previously created.
//..
export default function Home() {
  const toast = useToast();
  const address = useAddress();
  const { contract: sKaitokenContract } = useContract(sKAI_TOKEN_ADDRESS, "token");
  const { contract: dexContract } = useContract(KLAYSWAP_TEST_ADDRESS, "custom");
  const { data: symbol } = useContractRead(sKaitokenContract, "symbol");
  const { data: tokenMetadata } = useContractMetadata(sKaitokenContract);
  const { data: sKaiTokenBalance } = useTokenBalance(sKaitokenContract, address);
  const { data: nativeBalance } = useBalance();
  const isMismatched = useNetworkMismatch();
  const switchChain = useSwitchChain();
  const sdk = useSDK();
  const [nativeValue, setNativeValue] = useState<string>("0");
  const [tokenValue, setTokenValue] = useState<string>("0");
  const [currentFrom, setCurrentFrom] = useState<string>("native");
  const [loading, setLoading] = useState<boolean>(false);
  const { mutateAsync: swapNativeToToken } = useContractWrite(
    dexContract,
    "swapExactKLAYForTokens"
  );
  const { mutateAsync: swapTokenToNative } = useContractWrite(
    dexContract,
    "swapExactTokensForKLAY"
  );
  const { mutateAsync: approveTokenSpending } = useContractWrite(
    sKaitokenContract,
    "approve"
  );
  const executeSwap = async () => {
    setLoading(true);
    if (isMismatched) {
      switchChain(ACTIVE_CHAIN.chainId);
      setLoading(false);
      return;
    }
    try {
      if (currentFrom === "native") {
        await swapNativeToToken({ overrides: { value: toWei(nativeValue) } });
        toast({
          status: "success",
          title: "Swap Successful",
          description: `You have successfully swapped your ${
            ACTIVE_CHAIN.nativeCurrency.symbol
          } to ${symbol || "tokens"}.`,
        });
      } else {
        // Approve token spending
        await approveTokenSpending({ args: [KLAYSWAP_TEST_ADDRESS, toWei(tokenValue)] });
        // Swap!
        await swapTokenToNative({ args: [toWei(tokenValue)] });
        toast({
          status: "success",
          title: "Swap Successful",
          description: `You have successfully swapped your ${
            symbol || "tokens"
          } to ${ACTIVE_CHAIN.nativeCurrency.symbol}.`,
        });
      }
      setLoading(false);
    } catch (err) {
      console.error(err);
      toast({
        status: "error",
        title: "Swap Failed",
        description:
          "There was an error performing the swap. Please try again.",
      });
      setLoading(false);
    }
  };
//..
return  (
//..
)
}
In the code above,
- The toast variable was initialized using the useToast hook to show toasts in an application.
- The address variable was initialized using the useAddress hook to get the address of the connected wallet.
- The code uses useContract hook twice, first to instantiate the sKAI contract and then to instantiate the MiniKLAYswap contract.
- It also uses the useContractRead hook to read the token symbol for sKAI contract
- The code uses useContractMetadata to get the contract metadata of the deployed sKAI contract
- It also uses the useTokenBalance to get the token balance for a given wallet address; in this case the connected address.
- The useBalance hook was used to fetch the native token balance and stored in the nativeBalance variable.
- The useState hook was used to create several state variables, including nativeValue, tokenValue, currentForm, loading.
- Also the code uses useContractWrite hook to set the instances for calling the swapExactKLAYForTokens, swapExactTokensForKLAY function on the MiniKLAYswap contract and approve function on the sKAI contract.
- Finally we declared an executeSwap function to swapNativeToToken (KLAY to sKAI) and swapTokenToNative (sKAI to KLAY)
Next we updated the UI components to handle the swap functionalities.
//..
export default function Home() {
//..
return (
    <>
      <Head>
        <title>Decentralised Exchange</title>
        <meta name="description" content="Generated by create next app" />
        <meta name="viewport" content="width=device-width, initial-scale=1" />
        <link rel="icon" href="/favicon.ico" />
      </Head>
      <Navbar />
      <Flex
        direction="column"
        gap="5"
        mt="40"
        p="5"
        mx="auto"
        maxW={{ base: "sm", md: "xl" }}
        w="full"
        rounded="2xl"
        borderWidth="1px"
        borderColor="gray.300"
      >
        <Flex
          direction={currentFrom === "native" ? "column" : "column-reverse"}
          gap="3"
        >
          <SwapInput
            current={currentFrom}
            type="native"
            max={nativeBalance?.displayValue}
            value={nativeValue}
            setValue={setNativeValue}
            tokenSymbol="KLAY"
            tokenBalance={nativeBalance?.displayValue || "0"}
          />
          <Button
            onClick={() =>
              currentFrom === "native"
                ? setCurrentFrom("token")
                : setCurrentFrom("native")
            }
            maxW="5"
            mx="auto"
          >
            ↓
          </Button>
          <SwapInput
            current={currentFrom}
            type="token"
            max={sKaiTokenBalance?.displayValue}
            value={tokenValue}
            setValue={setTokenValue}
            tokenSymbol={tokenMetadata?.symbol}
            tokenBalance={sKaiTokenBalance?.displayValue || "0"}
            />
        </Flex>
        {address ? (
          <Button
            onClick={executeSwap}
            py="7"
            fontSize="2xl"
            colorScheme="twitter"
            rounded="xl"
            isDisabled={loading}
          >
            {loading ? <Spinner /> : "Execute Swap"}
          </Button>
        ) : (
          <ConnectWallet
            style={{ padding: "20px 0px", fontSize: "18px" }}
            theme="light"
          />
        )}
      </Flex>
    </>
  );
}
In the code above, we have three major components which are:
- NavBar: this component houses the app header (MiniKLAYswap Example) and ConnectWallet component which renders a button which when clicked opens a modal to allow users to connect to various wallets.
- SwapInput: this component handles the input field for the swap (both native (KLAY) and token(sKAI)).
- Execute swap button: this button performs the core swap functionality by calling the executeSwap function previously declared.
Testing the application
Congratulations 🥳 , you have successfully built a minimalistic frontend that interacts with the MiniKLAYswap contract created in part one using thirdweb and Next.js.

Conclusion
In conclusion, this tutorial demonstrated how to build a minimalistic frontend that interacts with the MiniKLAYswap contract using thirdweb and Next.js. As a result, you now better understand KLAYswap and how to integrate its swap functionalities in your contract and dApp. If you want more information, visit Klaytn Docs and KLAYswap Docs. If you have any questions, visit Klaytn Forum.