Building an on-chain dynamic SVG NFT using Foundry
Introduction
NFTs are identified by their token ID and token URI, which is sometimes also referred to as metadata. This metadata is most commonly stored using the https URI format, but it can also be stored using the data URI format.
Recently, developers came up with a way to utilize the data URI format to directly store the token URI within a smart contract, allowing NFTs to read any on-chain data, look up relevant state changes, user actions, and external activity, and dynamically modify what it displays accordingly.
In this tutorial, you will learn about dynamic NFTs and how to:
- Store on-chain SVG images and JSON objects using the data URI format
- Deploy and Interact with dynamic SVG NFT contract using Foundry
- Explore the dynamic features of the NFT by modifying the metadata based on your interactions with it
- View your SVG NFT on OpenSea
| NOTE: Storing token URI (SVG images and other attributes) directly on-chain uses a lot of gas. Thankfully, gas prices on Klaytn are extremely low! |
What are dynamic NFTs?
While NFTs are best known for static digital artwork that provide ease of authenticity and ownership verification for collectors, dynamic NFTs are capable of utilizing smart contracts to edit their metadata based on on-chain or off-chain data while retaining the same token ID. This opens up a myriad of new uses for NFTs, such as in video game progression, fantasy sports leagues, and the tokenization of real-world assets.
Getting started
Before we get started, it is important to understand why we will be utilizing SVGs for this dynamic NFT tutorial.
Scalable Vector Graphics (SVGs) is an image format that uses mathematical formulas to store images. This file format can be used to display two-dimensional graphics, charts, and illustrations, and can be easily resized without loss of quality.
The key difference with SVGs is that unlike pixel-based image files, SVGs are written in XML, which means they are able to store text information—which is a unique feature necessary for this tutorial’s dynamic NFT functionality, as we can pass the combination of three random words in our SVG file. Furthermore, they can be converted to base64 and displayed on the web using the data URI format without the need for a hosting provider.
Here’s an example of an SVG file:
xml

<svg xmlns="http://www.w3.org/2000/svg" preserveAspectRatio="xMinYMin meet" viewBox="0 0 350 350">,

<style>.base { fill: black; font-family: serif; font-size: 14px;}</style>,  <rect width="100%" height="100%" fill="white" ry="40" rx="40" style="stroke:#FF2F00; stroke-width:5; opacity:0.9" />

<text x="50%" y="20%" class="base" dominant-baseline="middle" text-anchor="middle">Klaytn</text>

<text x="50%" y="30%" class="base" dominant-baseline="middle" text-anchor="middle">Evm Compatibility</text>

<text x="50%" y="40%" class="base" dominant-baseline="middle" text-anchor="middle">Metamask</text>

<text x="50%" y="50%" class="base" dominant-baseline="middle" text-anchor="middle">Tatum</text>

<text x="50%" y="60%" class="base" dominant-baseline="middle" text-anchor="middle">Beginner</text>

<text x="1.2%" y="90%" class="base" dominant-baseline="middle" text-anchor="left" style="font-size:10px;">Klaytn is an open source public blockchain designed for tomorrow's on-chain world</text>

</svg>
For the purpose of this tutorial, we will be storing our SVG image and NFT attributes in a json metadata using the data URI specification.
Storing our SVG image using the data URI syntax will look like this:
data:image/svg+xml;base64,PHN2ZyB4………Storing our metadata using the data URI syntax will look like this:
data:application/json;base64,eyJuYW1- data: name of the scheme
- application/json: content type (can also be image/svg+xml)
- base64: the type of encoding used to encode the data
- eyJuYW1: … – the encoded data (SVG file, Metadata.json file )
Example:
// SVG image stored using the data URI format

data:image/svg+xml;base64,<encoded SVG file>

// NFT metadata stored using the data URI format

data:application/json;base64,<encoded metadata.json file>

<encoded metadata.json file> =>

{"name": "SVG NFT #1",

"description": "SVG NFT on Klaytn",

"image":"data:image/svg+xml;base64,<encoded SVG file>"

}
As can be seen from the above example, our file is in base64. For this reason, we will need the same implementation of base64 in Solidity for our smart contract—we will circle back to this later.
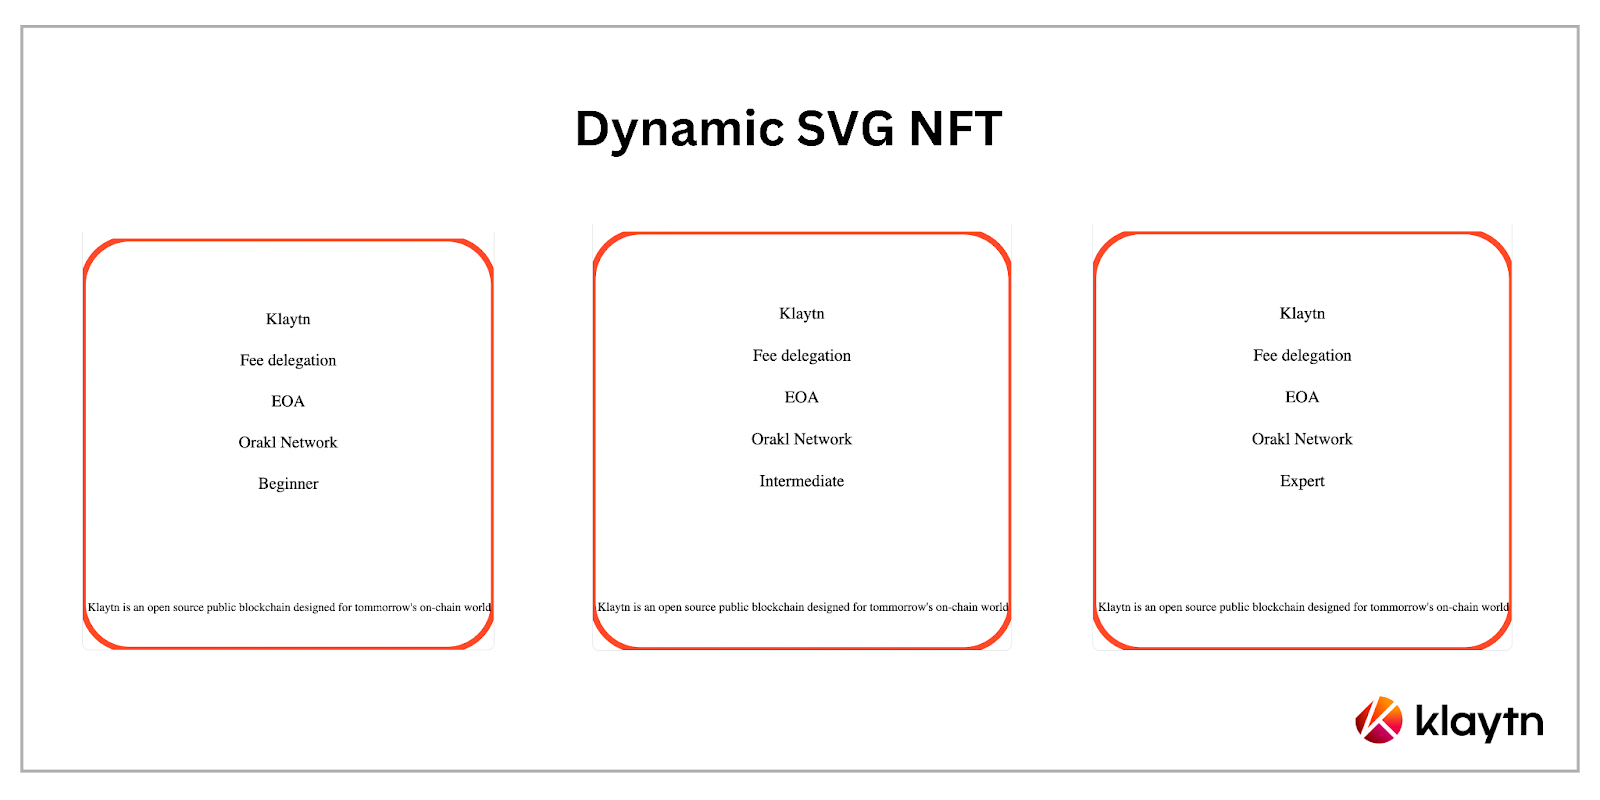
In this tutorial, we will be building a dynamic, upgradeable NFT that contains:
- The word ‘Klaytn’
- One of Klaytn’s unique features, randomly picked from a list
- One of Klaytn’s ecosystem partners, randomly picked from a list
- One Web3 term, randomly picked from a list
- The upgrade level of the NFT – Beginner, Intermediate, or Expert
- A short one-liner about Klaytn
The NFTs will look as follows:
Prerequisites
- An existing foundry project template. Follow this guide to set up your foundry project if you do not have one.
- Metamask Wallet.
- Test KLAY from the KLAY Faucet.
- RPC Endpoint: you can get this from one of the supported endpoint providers.
Creating a dynamic SVG NFT contract
We will begin by creating a dynamic SVG NFT contract using the klaytn contract library in a foundry development environment.
Step 1: Installing klaytn-contracts and configuring Solidity Optimizer in foundry.toml
In this step, you will install klaytn-contracts, a library for secure smart contract development on Klaytn. Further, you will make some customizations in your foundry development environment.
Install Klaytn contracts
To install Klaytn contracts, run the command below in your project folder terminal:
bash

forge install klaytn/klaytn-contracts
After successful installation, you will see the klaytn-contracts folder in lib/klaytn-contracts.
| Note: Make sure not to have untracked git files! |
Remappings
With foundry, we can remap dependencies to make them easier to import. One way to do this is by creating a remappings.txt file in the root of your project. Once you’ve created the file, paste the text below into your newly created file.
text

@klaytn/=lib/klaytn-contracts/
These remappings mean:
- To import from klaytn-contracts, you would write:
import “@klaytn/contracts/utils/Counters.sol”;
To learn more about remappings, read through this guide.
Setting Up Solidity Optimizer in foundry.toml
The following configurations will be done to enhance the behavior of the solidity compiler. To enable this configuration, open up your foundry.toml file and paste the following to the end of the file:
bash

optimizer=true

optimizer_runs=200

via-ir=true
Let’s quickly go over what each parameter does:
- optimizer: When set to true, it enables the Solidity optimizer.
- optimizer-runs: The amount of optimizer runs to perform.
- via-ir: If set to true, changes compilation pipeline to go through the new IR optimizer.
You can read more about these terms in the solidity docs and foundry docs.
Step 2: Importing contract dependencies
In this step, you will import the dependent contracts for the implementation of your dynamic NFT contract. The contracts are:
- KIP17URIStorage.sol: This contract is an extension of the KIP17 token contract obtained from Klaytn Contracts. It helps us manage our token URI based on token ids.
- Counters.sol: The counter contract in this case will be used to track the number of KIP17 tokens issued i.e each token ids.
- Strings.sol: When it comes to strings operations, we will make use of strings library to majorly convert uint256 to strings representation.
- Base64.sol: This contract provides a set of functions to operate with base64 strings.
| Note : One common application of Base64 encoding is to encode binary data so it can be included in a data: URL. Remember how we previously explained that we can use the data URI format to store our NFT metadata on-chain? This Base64 library is the key to that. |
To import the above dependent contracts, navigate to your project folder and create a new filename `SvgNFT.sol` in the `src` folder and add the following code to the top:
solidity

// SPDX-License-Identifier: Unlicense

pragma solidity ^0.8.11;

import "@klaytn/contracts/KIP/token/KIP17/extensions/KIP17URIStorage.sol";

import "@klaytn/contracts/utils/Counters.sol";

import "@klaytn/contracts/utils/Strings.sol";

import "@klaytn/contracts/utils/Base64.sol";
Step 3: Initializing the smart contract
Let’s get started by naming our contract SvgNFT, and also making it inherit its dependent contracts (KIP17URIStorage). Paste the following code below the import statements in SvgNFT.sol:
solidity

contract SvgNFT is KIP17URIStorage {

    using Strings for uint256;

    using Counters for Counters.Counter;

    Counters.Counter private _tokenIds;

    event NftMinted(uint _tokenId, string _experience, address _owner);

    event NftUpgraded(uint _tokenId, string _experience, address _owner);

    struct Details {

        uint8 randomFeature;

        uint8 randomCommon;

        uint8 randomEco;

        bool randStatus;

        string features;

        string commonterms;

        string ecosystem;

        string experience;

    }

    mapping(uint => Details) _idToDetails;

    address payable _owner;

}
Let’s quickly go over what each line of code does:
- First we initialized our Strings and Counter library. The `using Strings for uint256`means we’re associating all the methods inside the “Strings” library to the uint256 type.
- `using Counters for Counters.Counter` means we are assigning all the functions inside the Counters library, like current() or increment(), to the Counter struct.
- Next we set the Counters.Counter struct to a private variable called _tokenIds. The two events (NftMinted and NftUpgraded) were declared and to be emitted when an NFT is minted and upgraded respectively.
- Subsequently, the Details struct was declared to hold the dynamic details (combination of random words) to be displayed on the NFT.
- Then we mapped uint (token id) to the Details struct, and named it _idToDetails. Finally, we declared a payable owner address, who is the owner of the contract.
Step 4: Initializing the constructor
To get our contracts all working accordingly, we need to initialize some of the variables in our dependent contracts. Let’s first initialize KIP17 with the token name and symbol. Next, we set the _owner variable to the msg.sender. To do so, paste the following code below the previous code:
solidity

  constructor() KIP17("SVG NFT", "SVGNFT") {

        _owner = payable(msg.sender);

    }
Let’s figure out the function for the combination of our three random words for our dynamic NFT.
For this purpose, we will be creating a fixed array for each word theme. The themes are:
- Unique feature: A list of Klaytn’s unique features
- Ecosystem: A list of Klaytn’s ecosystem partners
- Common Web3 terms: A list of common web3 terms
This is what each array looks like:
solidity

string[10] memory features = [

            "1-second block generation",

            "EVM Compatibility",

            "Fee delegation",

            "4000 transaction per seconds",

            "Low gas price ",

            "Scaling Solutions - Service chains",

            "Ethereum Compatibility",

            "Open Source Infrastructure",

            "Protocol-level Eco Fund",

            "Governance by DAOs"

        ];

string[10] memory eco = [

            "Safepal",

            "Tatum",

            "Orakl Network",

            "Synapse",

            "Ozys",

            "Rabby Wallet",

            "Witnet",

            "ZKrypyo",

            "Klap Protocol",

            "Swapscanner"

        ];

string[10] memory common = [

            "ECDSA",

            "Metamask",

            "EOA",

            "Account Abstraction",

            "Gas Fees",

            "Cold Wallet",

            "NFTs",

            "KIP17",

            "Private Key",

            "IDE"

        ];
Now we will need to create a function to return a random word from the array. This function is declared for each word theme (uniqueFeature, commonTerms and ecosystem), and then it will make use of a pseudo random number generator with variable name randomSeed to store the random word.
In the case where a random value has not been stored, it generates a random number and stores the random word, else it returns the already generated random value. To do so, paste the code below the previous code.
solidity

    //stores a random unique feature word

    function _setUniqueFeatures(uint _tokenId) private {

        string[11] memory features = [

"",

            "1-second block generation",

            "EVM Compatibility",

            "Fee delegation",

            "4000 transaction per seconds",

            "Low gas price ",

            "Scaling Solutions - Service chains",

            "Ethereum Compatibility",

            "Open Source Infrastructure",

            "Protocol-level Eco Fund",

            "Governance by DAOs"

        ];

        uint randomSeed = uint(

            keccak256(abi.encodePacked(tx.origin, block.timestamp))

        );

        if (_idToDetails[_tokenId].randomFeature == 0) {

            uint8 random = uint8(randomSeed % features.length -1) + 1;

            _idToDetails[_tokenId].features = features[random];

            _idToDetails[_tokenId].randomFeature = random;

        }

        _idToDetails[_tokenId].features = features[

            _idToDetails[_tokenId].randomFeature

        ];

    }

    // stores a random common web3 term

    function _setCommonTerms(uint _tokenId) private {

        string[11] memory common = [

"",

            "ECDSA",

            "Metamask",

            "EOA",

            "Account Abstraction",

            "Gas Fees",

            "Cold Wallet",

            "NFTs",

            "KIP17",

            "Private Key",

            "IDE"

        ];

        uint randomSeed = uint(

            keccak256(abi.encodePacked(tx.origin, block.timestamp))

        );

        if (_idToDetails[_tokenId].randomCommon == 0) {

            uint8 random = uint8(randomSeed % common.length - 1) + 1;

            _idToDetails[_tokenId].commonterms = common[random];

            _idToDetails[_tokenId].randomCommon = random;

        }

        _idToDetails[_tokenId].commonterms = common[

            _idToDetails[_tokenId].randomCommon

        ];

    }

    // stores random ecosystem word

    function _setEcosystem(uint _tokenId) private {

        string[11] memory eco = [

"",

            "Safepal",

            "Tatum",

            "Orakl Network",

            "Synapse",

            "Ozys",

            "Rabby Wallet",

            "Witnet",

            "ZKrypyo",

            "Klap Protocol",

            "Swapscanner"

        ];

        uint randomSeed = uint(

            keccak256(abi.encodePacked(tx.origin, block.timestamp))

        );

        if (_idToDetails[_tokenId].randomEco == 0) {

            uint8 random = uint8(randomSeed % eco.length -1) + 1;

            _idToDetails[_tokenId].ecosystem = eco[random];

            _idToDetails[_tokenId].randomEco = random;

        }

        _idToDetails[_tokenId].ecosystem = eco[

            _idToDetails[_tokenId].randomEco

        ];

    }
Step 5: Creating the generateSVGImage function to create the SVG Image
As previously mentioned, we will be making use of the base64 library imported into our contract to convert our data to data URI spec in order to store the file directly on-chain. The code below generates our svg with a combination of three random words. Paste the following below the previous code:
solidity

function generateSVGImage(

        string memory _experience,

        uint tokenId

    ) public returns (string memory) {

        _setUniqueFeatures(tokenId);

        _setCommonTerms(tokenId);

        _setEcosystem(tokenId);

        bytes memory svg = abi.encodePacked(

            '<svg xmlns="http://www.w3.org/2000/svg" preserveAspectRatio="xMinYMin meet" viewBox="0 0 350 350">',

            "<style>.base { fill: black; font-family: serif; font-size: 14px;}</style>",

            '<rect width="100%" height="100%" fill="white" ry="40" rx="40" style="stroke:#FF2F00; stroke-width:5; opacity:0.9" />',

            '<text x="50%" y="20%" class="base" dominant-baseline="middle" text-anchor="middle">',

            "Klaytn",

            "</text>",

            '<text x="50%" y="30%" class="base" dominant-baseline="middle" text-anchor="middle">',

            _idToDetails[tokenId].features,

            "</text>",

            '<text x="50%" y="40%" class="base" dominant-baseline="middle" text-anchor="middle">',

            _idToDetails[tokenId].commonterms,

            "</text>",

            '<text x="50%" y="50%" class="base" dominant-baseline="middle" text-anchor="middle">',

            _idToDetails[tokenId].ecosystem,

            "</text>",

            '<text x="50%" y="60%" class="base" dominant-baseline="middle" text-anchor="middle">',

            _experience,

            "</text>",

            '<text x="1.2%" y="90%" class="base" dominant-baseline="middle" text-anchor="left" style="font-size:10px;"> ',

            " Klaytn is an open source public blockchain designed for tommorrow's on-chain world ",

            "</text>",

            "</svg>"

        );

        return

            string(

                abi.encodePacked(

                    "data:image/svg+xml;base64,",

                    Base64.encode(svg)

                )

            );

    }
From the code above, you’ll see that the function takes in _experience and tokenId as parameters.
Next we declared an svg variable of type bytes. This variable stores the SVG code representing the image of our NFT, transformed into an array of bytes using the abi.encodePacked() function.
In the same SVG code, you’ll notice we passed in some variables which represents the combination of our random words ( _idToDetails[tokenId].features, _idToDetails[tokenId].commonterms, _idToDetails[tokenId].ecosystem) and _experience which is changed when a user upgrades their experience level.
Since SVGs are written in XML, we can then pass in variables to dynamically change our SVGs based on certain interactions.
Finally, the function returns the encoded version of our SVG turned into Base64 using Base64.encode() with the data URI specification prepended, using the abi.encodePacked() function.
When this return value is pasted in the browser, it opens up an SVG Image with the random words specified.
Step 6: Creating the generateTokenURI function to generate the tokenURI
The tokenURI in this case points to the NFT metadata (images and other attributes of the NFT). To store it directly on-chain, we will have to encode it like we did for our SVG image in the step above. Paste this code below the previous code:
NB: This function is an implementation for generating token URIs following the data URI specification which is suitable for storing NFT details on-chain compared to storing them off-chain using IPFS.
solidity

    function generateTokenURI(

        uint256 tokenId,

        string memory _experience

    ) public returns (string memory) {

        bytes memory dataURI = abi.encodePacked(

            "{",

            '"name": "SVG NFT #',

            tokenId.toString(),

            '",',

            '"description": "SVG NFT on Klaytn",',

            '"image": "',

            generateSVGImage(_experience, tokenId),

            '"',

            "}"

        );

        return

            string(

                abi.encodePacked(

                    "data:application/json;base64,",

                    Base64.encode(dataURI)

                )

            );

    }
Let’s quickly go over what each line of code does:
- The dataURI variable of bytes type makes use of the abi.encodePacked function to create the metadata object for our NFT.
- In our JSON object, you will notice that the “name” property takes on a value of “SVG NFT #” and tokenId.toString(), and the “image” property takes on a value generated from the generateSVGCard() function.
- Finally, the function returns a string containing the array of bytes representing the Base64 encoded version of the dataURI with the JSON metadata, just like what we did with our SVG image. When this return value is pasted in the browser, it opens up a JSON object with the metadata specifications.
Step 7: Creating the mint function
The mint function creates an NFT with on-chain metadata. To create this function, paste this code below the previous code:
solidity

    function mint() public {

        _tokenIds.increment();

        uint256 newItemId = _tokenIds.current();

        _safeMint(msg.sender, newItemId);

        _idToDetails[newItemId].experience = "Beginner";

        _setTokenURI(

            newItemId,

            generateTokenURI(newItemId, _idToDetails[newItemId].experience)

        );

        emit NftMinted(

            newItemId,

            _idToDetails[newItemId].experience,

            msg.sender

        );

    }
As always, let’s quickly go over what each line of code does:
First we increment the value of our _tokenIds variable, then store its current value on a new uint256 variable called newItemId.
Afterwards, we call the _safeMint function from the KIP17 contract. It takes the msg.sender and newItemId as arguments. We then set the experience level of the NFT to “Beginner”.
Subsequently, we set the token URI passing the newItemId and the return value of getTokenURI().
With this, we will be able to store our NFT metadata completely on-chain and will be able to update the metadata directly from the smart contract.
Step 8: Creating the upgradeNFTLevel function
This function will be responsible for updating our NFT’s on-chain metadata when the user upgrades its levels from beginner to expert. To continue, paste this code below the previous code:
solidity

    function upgradeNFTLevel(uint256 tokenId) public payable {

        require(_exists(tokenId), "Please use an existing token");

        require(

            ownerOf(tokenId) == msg.sender,

            "You must own this token to train it"

        );

        require(

            msg.value == 10 ether || msg.value == 30 ether,

            "Send exact upgrade fee"

        );

        if (msg.value == 10 ether) {

            _idToDetails[tokenId].experience = "Intermediate";

        } else if (msg.value == 30 ether) {

            _idToDetails[tokenId].experience = "Expert";

        }

        string memory experience =  _idToDetails[tokenId].experience;

        _setTokenURI(tokenId, generateTokenURI(tokenId, experience));

        emit NftUpgraded(tokenId, _idToDetails[tokenId].experience, msg.sender);

    }
From the code above, you will notice the function accepts one parameter: the tokenId. Next we set the 3 require statements to check if:
- The token exists using the _exists() function from KIP17
- The msg.sender is the owner of the NFT tokenId
- The upgrade fee for intermediate (10 KLAY) and expert (30 KLAY) was paid
Subsequently we initialized the condition for setting the level of the NFT and upgradeFee for each tokenId based on the value sent in. It sets the level of the NFT based on the corresponding fees paid, else it sets it to beginner.
Further, we got the experience level of the NFT by using the value stored in _idToDetails[tokenid].experience mapping.
Next we called the _setTokenURI function passing the tokenId, and the return value of getTokenURI(tokenId, experience). This function changes the on-chain metadata to include the new experience level.
Finally we emitted the NftUpgraded event.
Step 9: Other functions
A: withdraw(): The withdraw function allows the owner to withdraw KLAY available in this contract.
solidity

    function withdraw() public {

        require(_owner == msg.sender, "Not owner");

        require(_owner.send(address(this).balance));

    }
B: getNftExperience(): This view function returns the experience level of the NFT given its token id.
solidity

    function getNftExperience(

        uint tokenId

    ) public view returns (string memory) {

        string memory experience = _idToDetails[tokenId].experience;

        return experience;

    }
Now that we have completed writing our dynamic SVG NFT smart contract, the next step is to deploy the smart contract on Klaytn Testnet Baobab and interact with it using foundry.
Deploying the Dynamic SVG NFT smart contract using Foundry
In this section you will compile, test and deploy the dynamic SVG NFT smart contract to Klaytn Testnet Baobab using Foundry, a speedy smart contract development toolchain.
| Note: You must be in your foundry project root folder. |
To deploy our contracts, we will go through the following steps:
Step 1: Compiling the contract
To compile the contract, run the code below in your terminal:
bash

forge build
After successfully running this command, your terminal should look like this:
bash

[⠆] Compiling...

[⠘] Compiling .. files with 0.8.19

[⠃] Solc 0.8.19 finished in 8.77s
Step 2: Testing the contract
To test your contract, navigate to the test folder and create a new file named `Svgnft.t.sol`. Paste the code below in your test file.
solidity

// SPDX-License-Identifier: UNLICENSED

pragma solidity ^0.8.13;

import "forge-std/Test.sol";

import "../src/SvgNFT.sol";

contract SvgNftTest is Test {

    SvgNFT public svgnft;

    // set a specified address for the prank action

    address _prankAddr = 0x2330384317C95372875AD81d5D6143E7735714A5;

    // an optional function invoked before each test case is run.

    function setUp() public {

        svgnft = new SvgNFT();

        // sets msg.sender to the specified address for the next call.

        vm.prank(_prankAddr);

        svgnft.mint();

    }

    function testCheckMint() public {

        assertEq(svgnft.balanceOf(_prankAddr), 1);

    }

    function testFail_UpgradeFee_lessThanZero() public {

       // sets up a prank from an address that has some ether.

        hoax(_prankAddr, 2 ether);

        svgnft.upgradeNFTLevel{ value: 1 ether }(1);

    }

    function testSvgNftwithUpgradeFeeOfTen() public payable {

        hoax(_prankAddr, 12 ether);

        svgnft.upgradeNFTLevel{ value : 10 ether }(1);

    }

    function testSvgNftwithUpgradeFeeOfThirty() public {

        hoax(_prankAddr, 32 ether);

        svgnft.upgradeNFTLevel{ value: 30 ether }(1);

    }

}
The code above tests for the following:
- If the dynamic NFT was minted to the specified address;
- If the uprageNFTLevel function fails when a lower corresponding upgrade fee was paid.
You can read more about testing in Foundry here.
To run the test above, run the code below:
bash

Forge test
This is what your terminal should look like after running the command:
bash

[PASS] testCheckMint() (gas: 10068)

[PASS] testFail_UpgradeFee_lessThanZero() (gas: 20639)

[PASS] testSvgNftwithUpgradeFeeOfTen() (gas: 470220)

[PASS] testSvgNftwithUpgradeFeeOfThirty() (gas: 463891)

Test result: ok. 4 passed; 0 failed; finished in 6.32ms
Step 3: Deploying the contract
To deploy the dynamic svg contract to Klaytn Testnet Baobab, run the command below:
bash

// format

forge create --rpc-url $RPC_URL --private-key $PRIVATE_KEY src/Svgnft.sol:SvgNFT
bash
// change the rpc and private key here
forge create --rpc-url https://public-en-baobab.klaytn.net --private-key 0xaaabbbccc… src/Svgnft.sol:SvgNFTAfter successfully running this command, you will get an output that looks like this:
bash

[⠆] Compiling...

No files changed, compilation skipped

Deployer: 0x2330384317C95372875AD81d5D6143E7735714A5

Deployed to: 0x620715ddFBc401857FcF4970919A668219a34f4b

Transaction hash: 0xe455e90a66b8f0ee0129ca5516ddea59b70db92ce1aaf3003034a6ef8b3e2571
You can verify this transaction by pasting the newly generated address on Klaytnscope.
Congratulations! You have just deployed a dynamic NFT contract with its metadata fully on-chain.
Next step is to interact with the contract by minting and upgrading the NFT.
Interacting with the dynamic SVG smart contract
In this section, you will mint a new dynamic NFT and also see its metadata change on-chain by calling the upgradeNFTLevel function. Let’s get to it in the following steps:
1. Minting NFT
To mint the NFT, open up your project folder terminal and run the command below:
bash

// format

cast send --rpc-url=<RPC-URL> <CONTRACT-ADDRESS> "function(uint256)" arg --private-key=<PRIVATE-KEY>
bash
// change the rpc and private key here
cast send --rpc-url=https://public-en-baobab.klaytn.net 0x620715ddFBc401857FcF4970919A668219a34f4b "mint()" --private-key=0xaaabbbccc…After successfully running this command, your terminal should look like this:

You’ve just minted your first dynamic NFT! To verify, navigate to OpenSea to see your newly minted NFT.

2. Upgrading NFT
To upgrade the NFT experience level, run the code below in your terminal:
| Note: you have to pay an upgrade fee of 10 KLAY for intermediate and 30 KLAY for Expert. |
bash

// format

cast send --rpc-url=<RPC-URL> <CONTRACT-ADDRESS> "function(uint256)" arg --private-key=<PRIVATE-KEY> —value 10ether
bash
// change the rpc, private key and value
cast send --rpc-url=https://public-en-baobab.klaytn.net 0x620715ddFBc401857FcF4970919A668219a34f4b "upgradeNFTLevel
(uint256)" 1 --private-key=0xaaabbbccc… --value 10etherAfter successfully upgrading your NFT, navigate to OpenSea to see if the experience level of the NFT changed to Intermediate.
| Note: You will have to refresh the metadata on OpenSea and reload the page to see this update. It may take some minutes to update metadata in OpenSea. Take a cup of coffee while updating! |

Voila! You just upgraded your NFT’s on-chain metadata by calling a smart contract function.
Conclusion
Congratulations! You’ve completed this tutorial on what dynamic NFTs are, how to write a dynamic SVG NFT, and how to deploy and interact with the smart contract using Foundry. This tutorial was deployed on Klaytn Testnet Baobab, and the same code will work for Klaytn Mainnet Cypress.
In this tutorial, we used a pseudo-random number generator as our source of randomness, which isn’t the best source of randomness. As a next step, you can explore using Orakl VRF for verifiable random number generation in your smart contract.
For more information about building on Klaytn using Foundry, please visit Klaytn Docs and Foundry Docs. And if you have any other questions, please feel free to drop by our Discord and ask away!