Introduction
Exciting use cases and creative projects like NFT, Defi, and Metaverse platforms have flourished with the rise of Web3 and blockchains like Klaytn. This new technology has ushered in a new paradigm, providing an opportunity for developers to create decentralized web applications. In order to rapidly create innovative use cases in little to no time without having to worry about the complexity associated with integrating Web3 technologies, developers need to have easy access to excellent developer tools. Thus, a unique development framework like Tatum is required.
Tatum is an open-source development platform for multiple blockchains, including Klaytn. Further, Tatum simplifies building blockchain apps by providing blockchain infrastructure, a unified API, and SDKs to developers. With Tatum’s built-in features, you can integrate Web3 into your project without hassle, as you don’t have to worry about development complexities such as node configuration or maintenance. You can learn more about what you can do with Tatum here.
Tatum offers three distinct ways to connect with the blockchain with a focus on the secure management of private keys as a security mechanism. These consist of:
a). Sending private keys/mnemonics seeds directly to Tatum’s API: This is not recommended in production and should be used in test mode only.
b). Using Tatum Libraries: Create wallets and sign transactions locally using Javascript or Java Library
c.) Using Tatum Key Management System(KMS): This is highly recommended and the safest way to securely manage private keys. Read more here
For the purpose of this guide, you will install and use the Tatum Javascript Library (tatum-js) and also explore some of the built-in features of Tatum on Klaytn, which include but are not limited to:
- How to generate a wallet
- Send KLAY to another wallet
- Check wallet balance
- Read blockchain info
- Integrate with Web3-js
Prerequisites
- Node and Npm
- Sign up on Tatum to get an API key
Getting Started
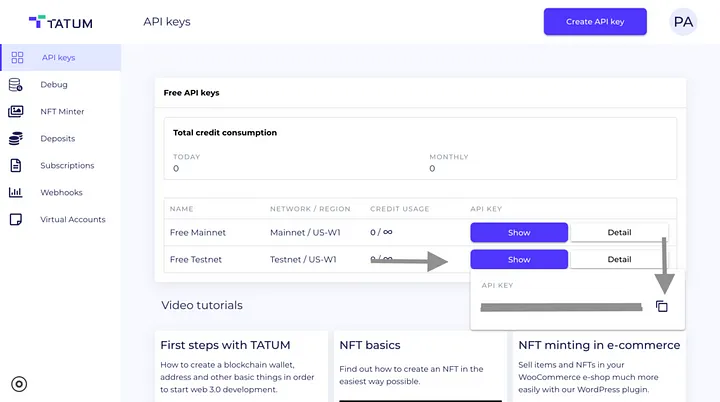
After successfully creating an account on Tatum, you now have access to your Tatum dashboard with 2 API keys, 1 for the testnet and 1 for the mainnet. Each Tatum API key can be used with any supported blockchain. For the purpose of this tutorial, the testnet API Key will be used. When in production, you can use the mainnet.
Your Tatum dashboard appears as such below:
Setup Environment
1. Create a new directory for your project
mkdir tatum-example2. Enter your new project directory:
cd tatum-example3. Next, initialise npm, install the tatum package,
npm init -y
npm install @tatumio/klaytn
4. Create a new folder called scripts in the root folder and create an `index.js` file to house the code
mkdir scripts
cd scripts
touch index.js
The Tatum Javascript Library makes the built-in Tatum functionality accessible. You can use this SDK to communicate with Tatum’s API. Moreso, Tatum gives you the option to pick one or more blockchain packages you want to employ in your project and install them independently for convenience. For instance, you already set up the @tatumio/klaytn package from npm, which contains Klaytn’s blockchain sub-package.
Initialize Tatum SDK
You must initialize the SDK with your API KEY in order to use Tatum’s built-in features in your project. Don’t have an API KEY yet, create one here
- Open your
index.jsfile in a code editor and input the following to initialize the SDK
import TatumKlaytnSDK from '@tatumio/klaytn'
const klaytnSDK = TatumKlaytnSDK( apiKey: ‘’ )
Using Tatum SDK on Klaytn
This section will go over some of the available functionality of Tatum SDK such as generating wallets, querying blockchain data, and sending transactions to the blockchain.
For more information about these features, click here
1. How to Generate a Wallet
With the Tatum SDK, you can create wallets, private keys, and deposit addresses on Klaytn with a few lines of code. This in turn allows users to initiate any transaction as well as send and receive any token. Let’s see this in action.
NOTE
Working with private keys
For testing and demo purposes, the code below creates blockchain wallets and private keys.
Your private keys and mnemonics, however, should never leave your security perimeter when used in production. We advise using Tatum CLI from the command line or the complex key management system, Tatum KMS, to correctly and securely construct wallets and operate with private keys.
A). Creating a blockchain wallet:
To generate a Klaytn wallet, you need to paste this snippet of code into your index.js file. The response contains two fields – a mnemonic and extended public key(xpub)
async function generateWallet()
const mnemonic, xpub = await klaytnSDK.wallet.generateWallet()

console.log(`Created a wallet with: " $mnemonic " and public key: " $xpub ".`)

generateWallet()
To see your newly created wallet, run the command below
node scripts/index.js
B.) Generating an address from the wallet:
Generating an address is as simple as passing your generated xpub. Paste the code below in your index.js file. The response contains the address for index number 1.
async function generateAddressFromXpub(xpub) {
const klaytnAddress  = await klaytnSDK.wallet.generateAddressFromXPub(xpub, 1)

console.log(`Created a wallet address: " $klaytnAddress " from the given xpub`)

Const xpub = “”

generateAddressFromXpub(xpub)
To see your newly created wallet address, run the command below
node scripts/ index.js
C.) Generating a private key from the wallet:
To generate a private key, you only need to provide your mnemonics instead of the xpub. Paste the code below in your index.js file. The response contains the generated private key for index number 1.
async function generatePrivatekeyFromMnemonics(mnemonics)
    const klaytnPrivatekey  = await klaytnSDK.wallet.generatePrivateKeyFromMnemonic(mnemonics, 1)
    console.log(`Created a private key: " $klaytnPrivatekey " from the given mnemonic`)


Const mnemonics = “”

generatePrivatekeyFromMnemonics(mnemonics)
To see your newly created wallet private key, run the command below
node scripts/index.js
Full Code for Generating Wallet
import  TatumKlaytnSDK  from '@tatumio/klaytn'

const klaytnSDK = TatumKlaytnSDK( apiKey: '’ )


async function generateWallet()
    const  mnemonic, xpub  = await klaytnSDK.wallet.generateWallet()
    console.log(`Created a wallet with: " $mnemonic " and public key:  " $xpub ".`)


async function generateAddressFromXpub(xpub)
    const klaytnAddress  = await klaytnSDK.wallet.generateAddressFromXPub(xpub, 1)
    console.log(`Created a wallet address: " $klaytnAddress " from the given xpub`)


async function generatePrivatekeyFromMnemonics(mnemonics)
    const klaytnPrivatekey  = await klaytnSDK.wallet.generatePrivateKeyFromMnemonic(mnemonics, 1)
    console.log(`Created a private key: " $klaytnPrivatekey " from the given mnemonic`)


const xpub= "";
const mnemonic = "";


generateWallet()
generateAddressFromXpub(xpub);
generatePrivatekeyFromMnemonics(mnemonic);
2. Check Balance of Address
You can query the blockchain for the balance of an address. To check the balance of an address, make sure it is well funded. Fund your address here.
Paste the code snippet below to check the balance of a given address. But in this tutorial we would be checking the balance of the newly created address above.
async function checkBalance (address)
    const  addressBalance  = await klaytnSDK.blockchain.getBlockchainAccountBalance(address)
    console.log(`This address " $address " has a balance of " $addressBalance.balance " `)


const address = "";

checkBalance(address)
To see the balance of the specified address, run the command below
node scripts/index.js
The image above shows the balance of the address before and after funding:
3. Query Data from the Blockchain
Tatum makes reading information from the blockchain easy. You would be able to do the following:
- GetGasInfo
- GetTransaction
- GetBlock
- GetCurrentBlock
- GetTransactionCount
Firstly, you need to create a new read.js file in the scripts folder and initialize the Tatum SDK like you did previously.
Secondly, paste the code below into your `read.js` file and run the command below to see the outcome of each function.
node scripts/read.jsGetGasInfo
async function getGasInfo ()
    // Get gasLimit and gasPrice for a transaction
    const gasInfo = await klaytnSDK.blockchain.estimateGas(
        from: '0xfb99f8ae9b70a0c8cd96ae665bbaf85a7e01a2ef',
        to: '0x687422eEA2cB73B5d3e242bA5456b782919AFc85',
        amount: '100000',
      )
      console.log('Gas estimate: ', gasInfo)


getGasInfo()Output:

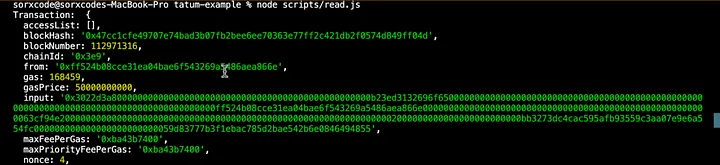
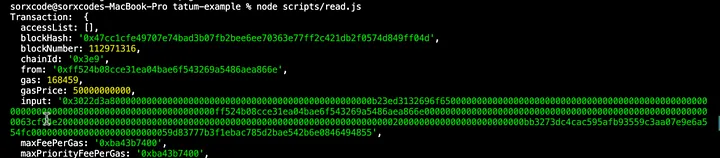
GetTransaction
async function getTxInfo ()
    // Get transaction details by hash
  const transaction = await klaytnSDK.blockchain.getTransaction(
    '0x9a4c09556204735c2818eaeed9fd0a530dba4f1ad6f771c7451a217ce373268d',
  )
  console.log('Transaction: ', transaction)


getTxInfo()
Output
GetBlock
async function getBlock ()
  // Get block by hash
  const block = await klaytnSDK.blockchain.getBlock(
    '0x9089a6d4d24ddebfec27f9db7527bd6bf2ba0628efa1ea67084d91aeaf43d7b5',
  )
  console.log('Block: ', block)


getBlock()
Output
GetCurrentBlock
async function getCurrentBlock ()
  // Get curent block
  const currentBlock = await klaytnSDK.blockchain.getCurrentBlock()
  console.log('Current block: ', currentBlock)


getCurrentBlock()
Output

GetTransactionCount
async function getTransactionsCount ()
      // Get transaction count of an address
    const transactionsCount = await klaytnSDK.blockchain.getTransactionsCount(
        '0x99abc3bbd2f001ce629bc4de078ba8f5e80f4af9',
      )
      console.log('Transactions count: ', transactionsCount)


getTransactionsCount()
Output

Full Code
import  TatumKlaytnSDK  from '@tatumio/klaytn'

const klaytnSDK = TatumKlaytnSDK( apiKey: ‘’ )

async function getGasInfo ()
    // Get gasLimit and gasPrice for a transaction
    const gasInfo = await klaytnSDK.blockchain.estimateGas(
        from: '0xfb99f8ae9b70a0c8cd96ae665bbaf85a7e01a2ef',
        to: '0x687422eEA2cB73B5d3e242bA5456b782919AFc85',
        amount: '100000',
      )
      console.log('Gas estimate: ', gasInfo)

async function getTxInfo ()
    // Get transaction details by hash
  const transaction = await klaytnSDK.blockchain.getTransaction(
    '0x9a4c09556204735c2818eaeed9fd0a530dba4f1ad6f771c7451a217ce373268d',
  )
  console.log('Transaction: ', transaction)


async function getBlock ()
  // Get block by hash
  const block = await klaytnSDK.blockchain.getBlock(
    '0x9089a6d4d24ddebfec27f9db7527bd6bf2ba0628efa1ea67084d91aeaf43d7b5',
  )
  console.log('Block: ', block)

async function getCurrentBlock ()
  // Get current block
  const currentBlock = await klaytnSDK.blockchain.getCurrentBlock()
  console.log('Current block: ', currentBlock)

async function getTransactionsCount ()
      // Get transaction count of an address
    const transactionsCount = await klaytnSDK.blockchain.getTransactionsCount(
        '0x99abc3bbd2f001ce629bc4de078ba8f5e80f4af9',
      )
      console.log('Transactions count: ', transactionsCount)


getGasInfo()
getTxInfo()
getBlock()
getCurrentBlock()
getTransactionsCount()
4. Send Native Transaction
To sign a native transaction such as sending KLAY from one account to another, you must sign with the private key of the blockchain address from which the fee will be deducted. For this tutorial, we will use the previously generated private key as it only for testing purposes.
It is highly recommended while in production to sign transactions with signature ID as provided by Tatum Key Management Key System(KMS).
Let’s go through sending transaction in the following steps:
Firstly, you need to create a new sendTx.js file in the scripts folder and initialize the Tatum SDK like you did previously.
Secondly, paste the code below into your sendTx.js. The sender’s private key used here was the one generated previously using the generatePrivatekeyFromMnemonics
(mnemonics) function.
import  TatumKlaytnSDK  from '@tatumio/klaytn'

const klaytnSDK = TatumKlaytnSDK( apiKey: ‘’ )

async function sendNativeTx ()
  const senderPrivateKey = ''

  const receiverAddress = ''

  // send native transaction using private key
  const txId = await klaytnSDK.transaction.send.transferSignedTransaction(
    to: receiverAddress,
    amount: '0.0001',
    fromPrivateKey: senderPrivateKey,
  )

  console.log(`Transaction using private key was sent txID =`, txId)

  // Note: you can also send native transaction using signatureId
  // signatureId from Tatum KMS - https://docs.tatum.io/private-key-management/tatum-key-management-system-kms


sendNativeTx()
Thirdly, run the command below to see the transaction id

To confirm this transaction on Klaytn Block Explorer(Klaytnscope), paste the transaction id in the search bar
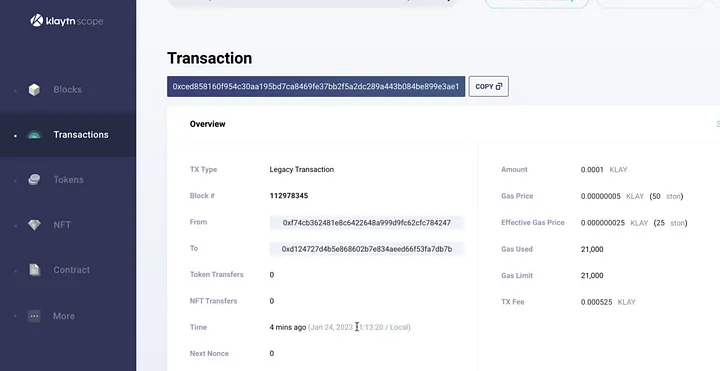
5. Use Web3-js with Tatum
Tatum provides you the flexibility of using web3-js in your projects. Let’s get started in the following steps:
Firstly, you need to create a new web3.js file in the scripts folder and initialize the Tatum SDK like you did previously.
Your web3.js file should look like dis
import  TatumKlaytnSDK  from '@tatumio/klaytn'

const klaytnSDK = TatumKlaytnSDK( apiKey: '’ )

const web3response = await klaytnSDK.httpDriver(
  jsonrpc: '2.0',
  method: 'web3_clientVersion',
  params: [],
  id: 2,
)

const web3 = klaytnSDK.web3Client()
After successfully initialising the SDK, you should be able to interact with Klaytn blockchain using web3-js
A.) getBlockNumberWithWeb3
async function getBlockNumberWithWeb3 ()
// gets the current block number
const blockNumber = await web3.eth.getBlockNumber()
console.log(blockNumber);
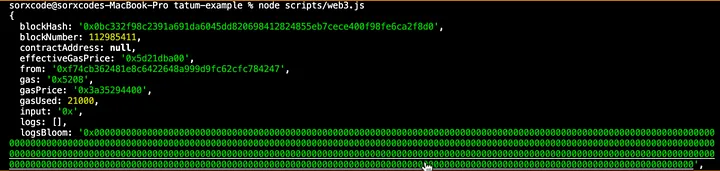
getBlockNumberWithWeb3()Run the command below to see the result of each function:
node scripts/web3.jsOutput

B.) getAddressBalanceWithWeb3
async function getBalanceWithWeb3 ()
	// Returns the KLAY balance of address in web
    const myAddress = '' //TODO: replace this address with your own public address
    const receipt = await web3.eth.getBalance(myAddress);
    console.log(receipt);


getBalanceWithWeb3()
Output

C.) sendTransactionWithWeb3
async function sendTransactionWithWeb3 ()
	// sends transaction to the Klaytn blockchain
    const privateKey = "";
    const senderAddress = "";
    const receiverAddress = "";

    const tx = await web3.eth.accounts.signTransaction(
        from: senderAddress,
        to: receiverAddress,
        value: 90000000000,
        gasPrice: 250000000000,
        gas: 21000,
    , privateKey)

    const receipt = await web3.eth.sendSignedTransaction(tx.rawTransaction)
    console.log(receipt);


sendTransactionWithWeb3()
Output
Full Code
import  TatumKlaytnSDK  from '@tatumio/klaytn'

const klaytnSDK = TatumKlaytnSDK( apiKey: '’ )

const web3response = await klaytnSDK.httpDriver(
  jsonrpc: '2.0',
  method: 'web3_clientVersion',
  params: [],
  id: 2,
)

const web3 = klaytnSDK.web3Client()

async function getBlockNumberWithWeb3 ()
    const blockNumber = await web3.eth.getBlockNumber()
    console.log(blockNumber);


async function getBalanceWithWeb3 ()
    const myAddress = '' //TODO: replace this address with your own public address
    const receipt = await web3.eth.getBalance(myAddress);
    console.log(receipt);


async function sendTransactionWithWeb3 ()
     const privateKey = "";
    const senderAddress = "";
    const receiverAddress = "";

    const tx = await web3.eth.accounts.signTransaction(
        from: senderAddress,
        to: receiverAddress,
        value: 90000000000,
        gasPrice: 250000000000,
        gas: 21000,
    , privateKey)

    const receipt = await web3.eth.sendSignedTransaction(tx.rawTransaction)
    console.log(receipt);


getBlockNumberWithWeb3();
getBalanceWithWeb3();
sendTransactionWithWeb3();
Conclusion
To integrate Web3 into your projects with ease and speed as a developer, you need tools like Tatum. In this tutorial, we installed the tatum-js SDK, discussed its features, and described Tatum as an open-source development platform for multiple blockchains. Additionally, you were able to send transactions, get data on the Klaytn blockchain, verify an address balance, and also use Web3-js with the Tatum SDK. With that said, users can also deploy prebuilt ERC20, ERC721, and ERC1155 smart contracts using this SDK, and also interact with an existing contract given its address and ABI.
If you want more information, visit Klaytn Docs andTatum. If you have any questions, visit Klaytn Forum. In our next article, we will look at how to deploy and interact with smart contracts using Tatum SDK. Stay Tuned!